Step 1: DESIGN BRIEF
A product design process starts with a design brief. This document should contain information such as: Project description, Project objectives, Stakeholders involved, Competitors benchmarking, Requirements and desired features for the product, Technical bottlenecks expected, Timeline, Marketing goals (target audience, target price, target distribution channels) and perhaps most important: target price and budget available for the whole project.
Step 2: RESEARCH & STRATEGY
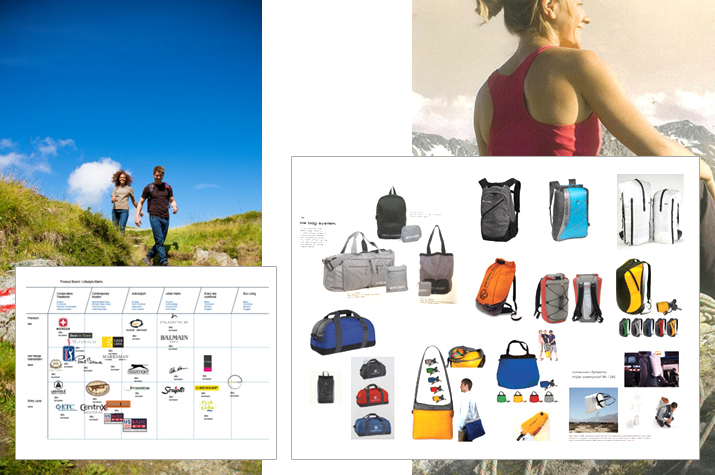 Extra research made by the designer is needed in order to confirm the competitive brands and similar solutions and explore the lifestyle and needs of the user target group from a design standpoint, these insights are organized in mood boards and a presentation.
At this time the strategy outline in the design brief should be confirmed, the goal of this step is to correctly identify the problem that needs to be solved in such a way that all the steps that follow can be matched with the brief and strategy documents.
Step 3: CONCEPT SKETCHES
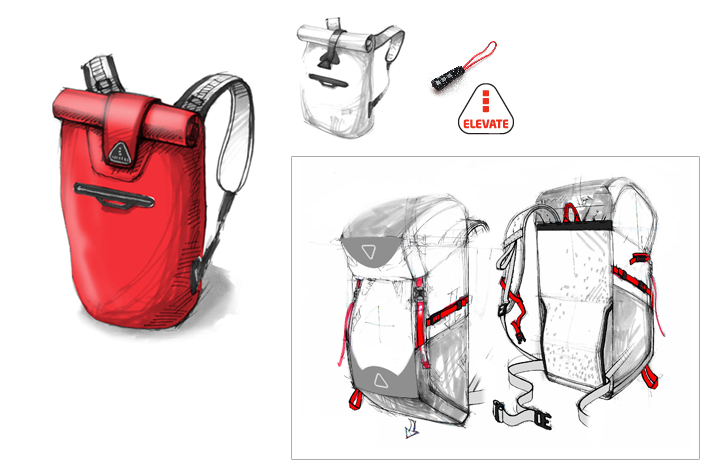 I start working on concept proposals to solve the design brief. The goal is to come up with as many solutions as possible in the timeframe given. I explore various styles, shapes and features that can solve the design problem while observing the branding and marketing restrictions.
I analyze the desired features and categorize them into priority levels. I look at interdependencies and how changing elements can affect the looks and cost of the final product and I look at pros and cons of various production methods and materials.
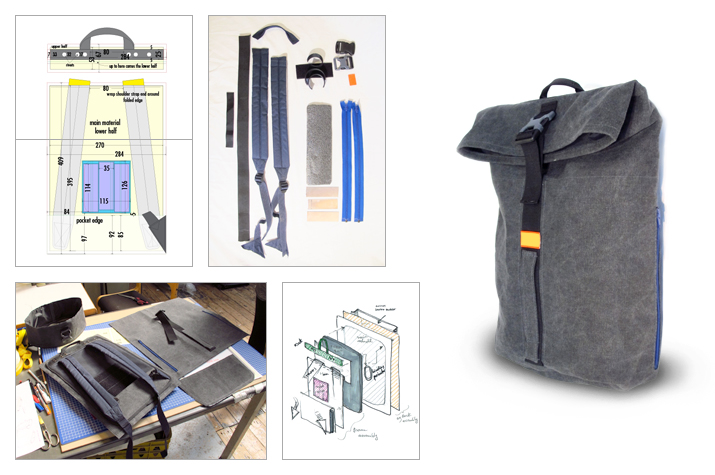
Step 4: BASIC PROTOTYPE
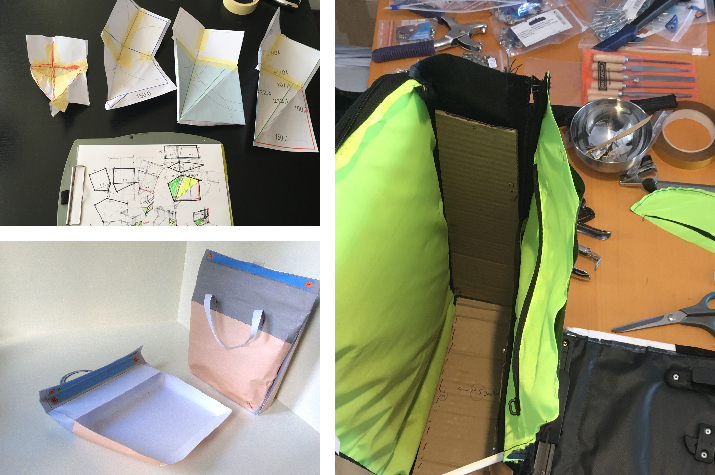 A paper prototype is a very useful step in making decisions about proportions, size, patterns and sequence of assembly. An initial technical drawing needs to be made on the computer, paper patterns are printed, cut and then glued together.
A “Frankenstein” prototype is where existing models of bags are cut into components and assembled together. The end result is similar in shape and function to the desired model. This kind of approach is not aesthetically-oriented but it is a very useful step to test the basic functionality of a concept.
Step 5: REFINED RENDERINGS
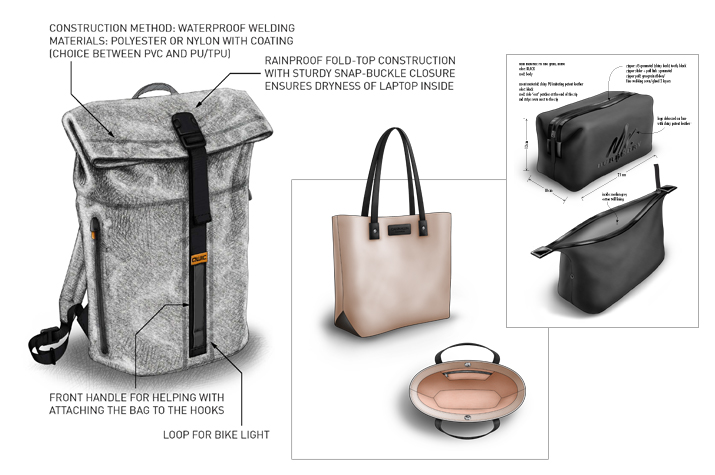 Incorporating the lessons learned by making a prototype I make refined visuals that further explain the concept.
Using 2D computer programs I make drawings where texture, colors and shading are used to produce photorealistic images that are close to a 3D rendering.
This stage also clarifies the details of the model, all the features, parts and components. Sometimes more than one view or exploded views are necessary.
Step 6: TECH PACK
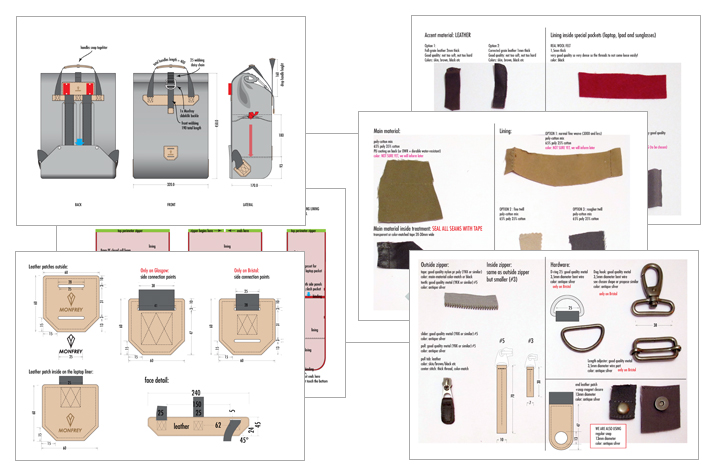 In order for me or the factory to build the next prototype, a document is needed with all the parameters specified in detail:
– dimensions and descriptions of all the parts: front, sides, back, bottom, interior panels, pockets and features
– actual unfolded/flat patterns
– reinforcements and build sequence
– specifications for fabrics including type, weight, thickness and color
– itemized descriptions of components, trims, accessories and hardware
– construction cross-section views and exploded views.
Step 7: COMPLEX PROTOTYPE
 This prototype is usually made by a factory (in Asia) because it is cheaper than making this locally in Europe. The added benefit is that the factory can also give an estimate production quote after completing the sample.
If I make the prototype I follow certain steps: First I buy all the fabrics, hardware and trims. Then the patterns are printed on paper and these paper patterns are in turn used to cut the pieces of fabric. These pieces form assemblies that also receive pockets, zippers, closures and other features. In the end all the assemblies are sewn together to form the final product.
Step 8: REVISIONS AND DEVELOPMENT
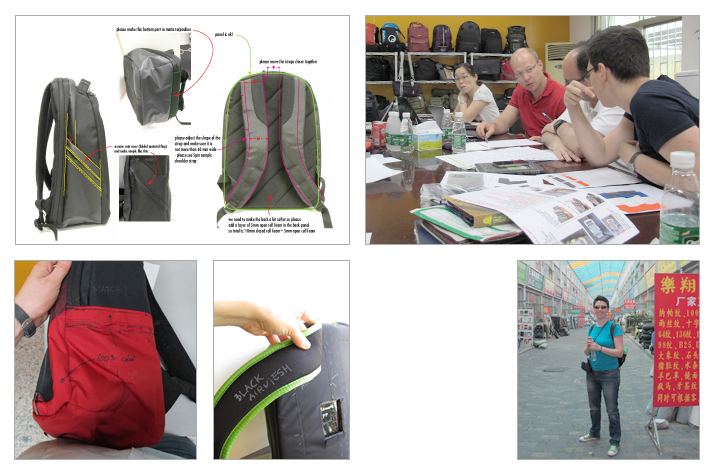 The sample that comes from the factory or the prototype I make is reviewed and tested. Usually there are changes and improvements needed, this is normal. As many end-users as possible should be asked for feedback and all these comments should be clearly communicated to the factory so they can make a pre-production sample and give a revised quote. A very useful step at this point is to travel to the factory and discuss all the details with the factory engineers. Usually two or even three rounds of revisions are necessary to get the desired set of features/fabrics at the chosen target price, negotiations are crucial.
EXTRAS: 3D COMPONENTS
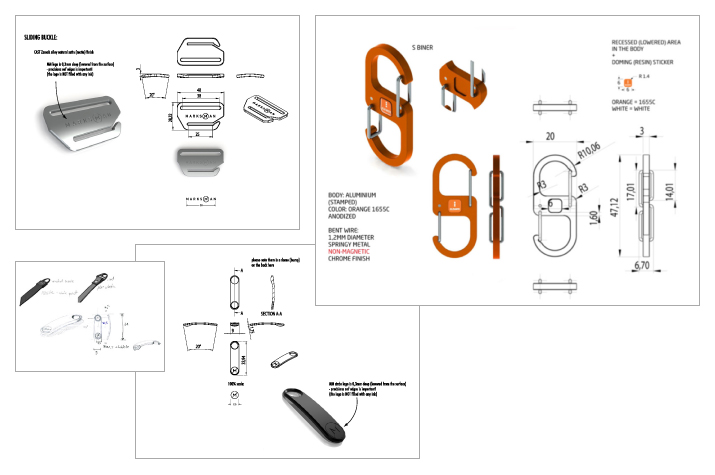
I use a special program to build a 3D model that is technically accurate and fully dimensioned. This is very useful when designing parts that need to be molded: like a zipper of a closure or a custom EVA bag panel.
I can then make pictures (renderings) of this virtual product and I can also extract 2D technical drawings (dimensioned views). 3D modelling can take many hours to complete, especially if complex geometry is required (organic, asymmetric, many parts).
EXTRAS: 2D GRAPHICS
![]() I can design vector logos, brand manuals, icons sets, layouts, complex diagrams, labels, visual explanations.
I can design vector logos, brand manuals, icons sets, layouts, complex diagrams, labels, visual explanations.
Also I can design prints, graphic motifs, step-repeat patterns and illustrations.
This type of 2D artwork is called “vector artwork” and is based on mathematical formulas, these type of artwork can be scaled from very small to very big without losing quality. Precise artwork is usually required for silkscreening, debossing, embroidery or other industrial processes.